| 1. |
Trip information |
This section show the following information:
Vehicle number | Current route name | Current stop name
|
| 2. |
Top menu bar |
- End Route: Once the drivers have reached the end of the route, they must then select End Route button to finish their trip.
- Next Trip: Start the next route in the same route category of the current route. The driver will be asked to enter the start and end odometer of the current route in order to start the next trip. Note: this button will be disable if the current route is the last route in its route category.
- Add Fund: Add funds to a smartcard account by cash/credit card.
- Transactions: Show the transaction list of current stop. The driver also can cancel tickets from Transaction List screen.
- More: Show more options a driver can do.
 |
- Duress: allow drivers to send duress message to registered alert contacts. When the DURESS! button is pressed then the camera in the iPad is activated and it will record a video. To get access to the video, the operator may contact Transportme to be granted access to the video.
- Over 90% Capacity: select the button to report to the system when the vehicle is over 90% capacity.
- Change Driver: allows you to end your shift. Another driver will login, start their shift and take over the current trip.
- Inbox: allow drivers to check inbox.
- Fuel Fill: open Add Fuel Fill Entry to enter fuel fill information.
- Stop List: Lists every stop within current route. The drivers can scroll up and down to the required stop to either create or delete a transaction if required.
- Handbook: open Handbook screen so the drivers can check all handbooks.
- Route Guidance: show route line of the current route if it is available to guide the drivers turn by turn.
|
|
| 3. |
Time |
- Current time of the device | Scheduled departure time of the current stop
- Departure time color:
- green - it’s time to depart.
- red - you’re early! Wait until time is green.
- Note: Departure time is only shown if On Time Running check box of the route was selected on the Operator portal.
|
| 4. |
GPS signal status / Changing stop mode. |
- When GPS strength is not available, the driver should select Manual to move to the next stop.
- When in Automatic mode, stops will be changed automatically based on the GPS location.
|
| 5. |
Boarding point / current stop. |
When changing stop mode in Manual, the driver can select left arrow < or right arrow > to change the boarding point.
|
| 6. |
Total passengers |
Show the current number of people on the bus.
|
| 7. |
Passenger count |
Tap on add + or minus – buttons will manually add or deduct the number of passengers on the vehicle:
- Fare Evade: count passengers who refused to buy the tickets (extra module).
- Pax Count: count passengers who are not required to buy tickets (extra module).
- SSTS pax count: count passengers who are not required to buy tickets (for TfNSW Driver app).

Note: Fare Evade and Pax Count are only shown if the Operator paid for these features. |
| 8. |
Passenger Types / Ticket Types |
 |
|
Select number of passenger to sell the tickets.
- When the passengers do not use smartcard, the driver decide which ticket type should be suitable for the passengers then select the number of passengers by using the up arrow ˄ and down arrow.
- Note:
- Scroll left to right to display more ticket types. This list is created by the operator.
- Once the drivers have selected the number of passengers, choose the destination point at next step in section Select Destinations.
|
|
| 9. |
Destinations |
 |
|
Choose the destination point so the app can calculate the ticket amount later.
- Select a destination point from popular stop list in Select Destinations area.
- Or select the bus icon under Select Other Stop text to bring up a list of all possible stops on the route.
|
|
| 10. |
Transaction Details |
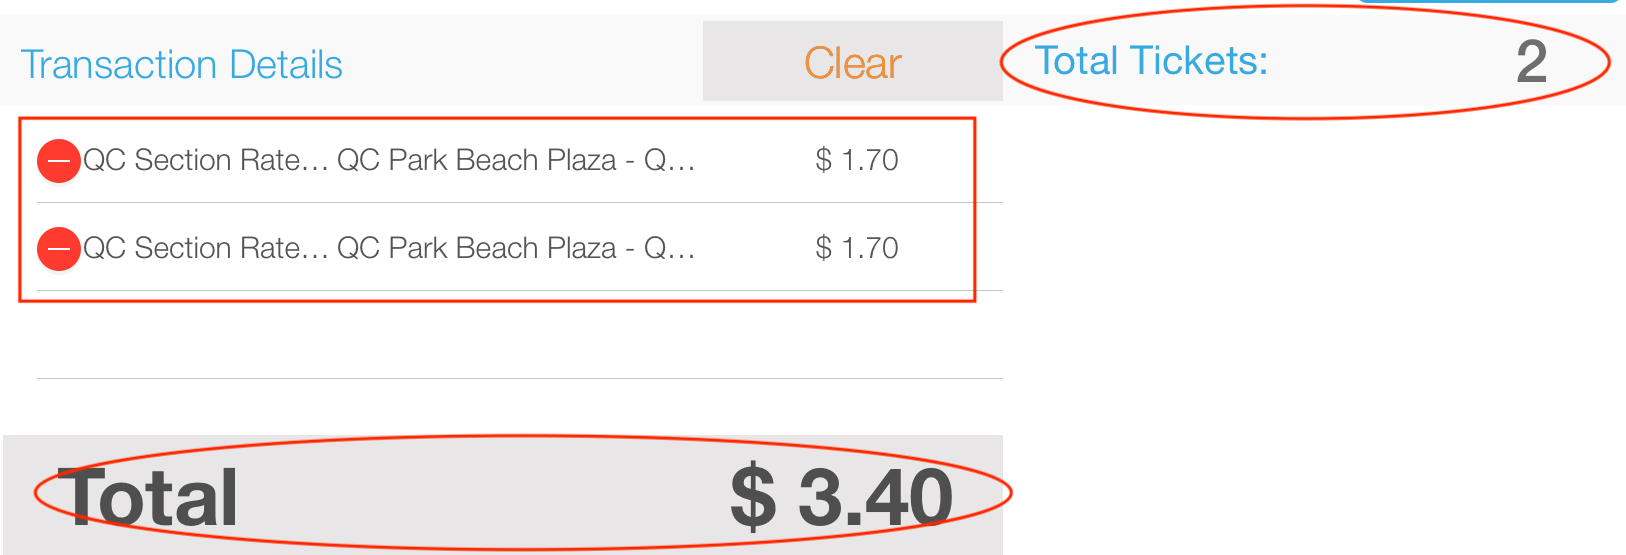 |
Transaction box: This area will bring up the fare value for what were chosen from part (8) and (9)
- The transaction details show: Ticket Type which was chosen from part (8) | boarding point - deboarding point which was chosen from part (9) | ticket amount.
- Select delete circle icon to delete single passenger off a group ticket.
- Clear button: select the button to delete all of the passengers from the transaction.
|
|
| 11. |
Action group |
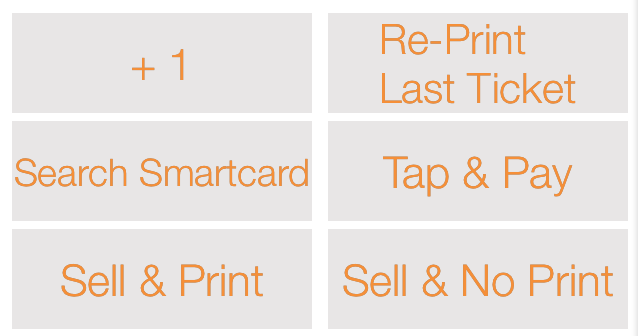
- +1 button: add a new ticket as the last ticket in the Transaction Details list (10) to the Transaction Details list. Selecting the +1 button when the Transaction Details list is empty will do nothing.
- Re-Print Last Ticket: print the last ticket that has been sold. Note: It will not add another ticket to the system – it is solely a re-print function.
- Search Smartcard: select this button to search and charge transaction to a smartcard. This can be used when cardholder has forgotten their physical smartcard.
- Tap & Pay: sell the ticket with credit card. Select this button will send payment request to POS device. Please ensure that the driver does not drive to the next stop before payment has been processed on the iPad.
- Sell & Print: sell the ticket and physically print a receipt from the printer.
- Sell $ No Print: sell the ticket without printing out the receipt.
|
| 12. |
Device connection status |
 |
This group informs the driver whether the printer, Pax POS, card reader, pin generator (if any) are connected or not.
- Red X circle: not connected.
- Green ticked circle: connected and is ready to use.
Note: the driver can check more details about the device connection status in app Settings article. |
|
| 13. |
Stop List |
Display the list of bus stops with departure times (if any) by stop order.
- Blue stop name: current stop.
- Bold stop name: mid point.
- Orange stop name: haven’t arrived yet.
When the driver cannot follow the stop order as defined in the Stop List, the stops in this Stop List will not be changed automatically. However, the driver can change the current stop manually by selecting a stop name in the list with prompt. . |
| 14. |
FAB button |
Select the button to check more promoted actions on the app.
- Help
- Bluetooth reset
- Push to talk
Note: the driver can check more details from FAB button article. |


