
Create a ticket
- Login to Transportme™ or QST or TfNSW operator portal.

- Select Tickets tab on top menu.
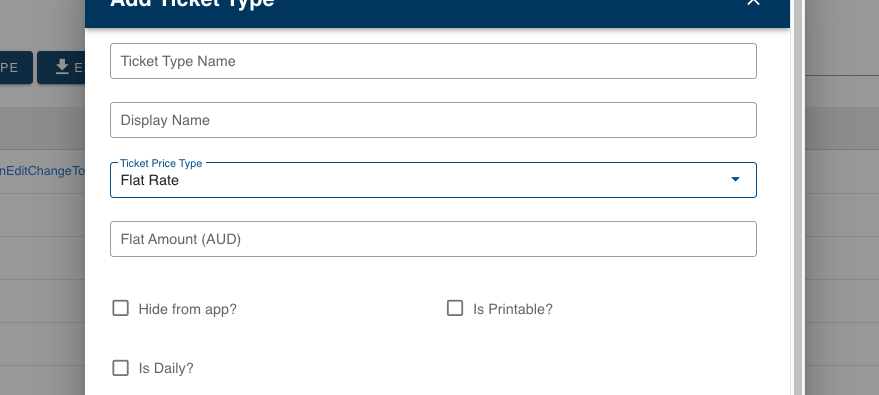
- Select + New Ticket Type or Add New Ticket Type button to open Add Ticket Type screen to create a new ticket.
- Enter new ticket type information into fields:
- Ticket Type Name (mandatory): name of the ticket type.
- Display Name (mandatory): name of the ticket type to be displayed on the Driver app.
- Ticket Price Type (mandatory): choose from the dropdown list appropriate price type
- Flat Rate: choose the fare amount and type in Add Flat Rate in AUD. Timetables/Charter fares/Freight are some of the examples of flat rate.
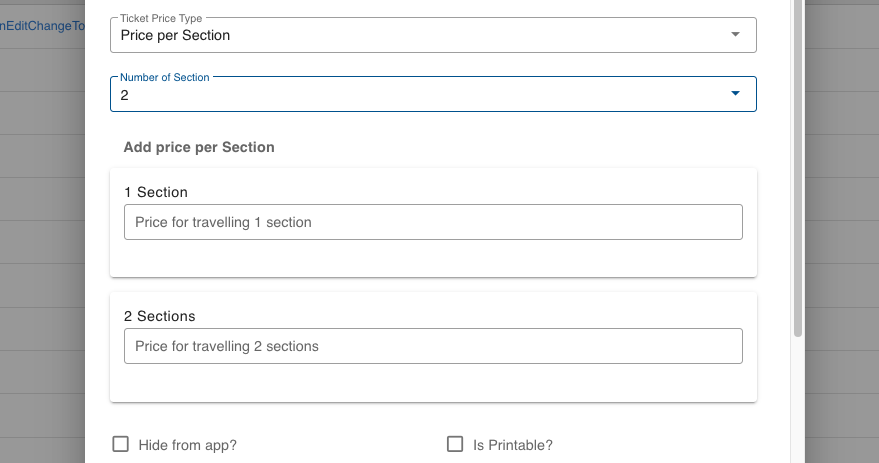
- Price Per Section: such as point to point pricing. Pick up how many sections that ticket type will be applicable for in the Number of Section then enter the fare amount for each section. Note: This will be applied when a route is using section travelled chart or zone to zone ticket.
- Manual Price: This is a flexible price ticket as the driver will enter the ticket amount directly on the Driver app.
- Hide from app?: choose if you want not to show the ticket type on the Driver app during the trip.
- Is printable?: choose if the ticket type is printable from the Bluetooth printer. Some tickets as “transfer tickets” may not be needed to be counted and not printed.
- Is Daily?:
- Expiry time set up. If none of the following options are selected, the expiry time will be set as the date of ticket sale.
- Is Daily?: The ticket's expiry time is set to the same date as the purchase date.
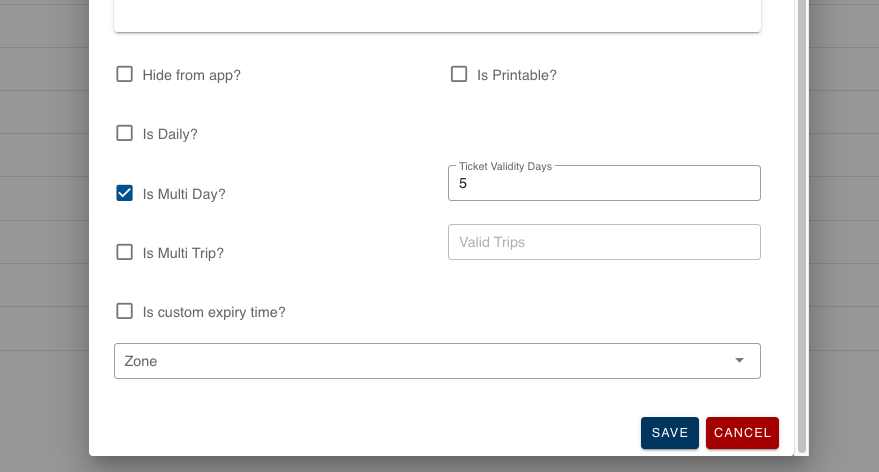
- Is Multi Day?: Select this option and enter the number of days for which the ticket is valid, including the date of purchase. For example, if you choose a 5-day expiry ticket, it will be valid for 5 days starting from the selling ticket date.

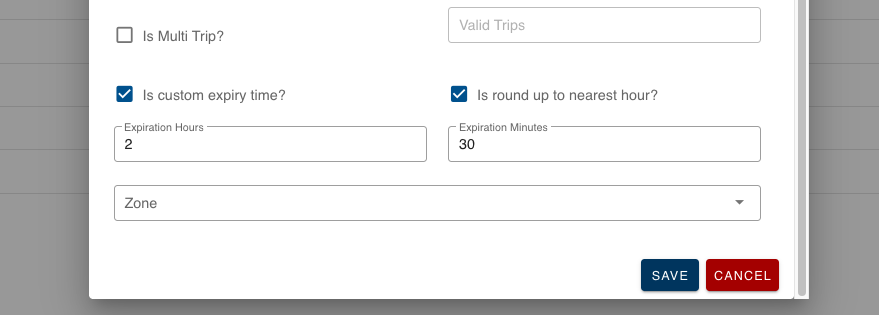
- Is custom expiry time: Select this option and then choose Is round up to nearest hour if you want the expiry time to be rounded up to the nearest hour. Next, enter the number of hours and minutes after which the ticket will expire in the field of Expiration Hours and Expiration Minutes. Here is an example of a custom expiry time ticket which will be expired after 2 hours and 30 minutes, and the rounding up option is enabled.

-
- Is Multi Trip?: choose if the ticket is a “Multi Trip” ticket then enter how many trips it is valid for. For example: 10 trip ticket.
- Ticket Type For Worksheet Declaration: this option is used for Worksheet Declaration report.
- Ticket Type for TfNSW Reporting: this option is used for ODIN reporting. -- NOTE :: ALL TICKET TYPES MUST BE "PRICE PER SECTION" TO APPEAR CORRECTLY IN ODIN REPORTS, Free tickets can be Price per section with each section being $0
- Select the Save button to save new ticket.


Notes:
- If you are in the process of creating new route, the recommended next step after creating ticket is to create new route category and create new route.
- The available information on the form depends on the operator's set up.